How to animate images based on the cursor position using jQuery. Have you seen our former contact page? We had the rotating heads integrated. When I first wrote this post. That was state of the art for our page. But we advance fast. Hence the feature is gone. But we still love it and got great feedback from customers, friends and friendly developers.
Awesome, I know. And don't worry, I am going to explain to you step by step how I got this head to follow your cursor. I mean, who doesn't want to see his own head spin around like a maniac for hours a day?
Download this project as a .zip file
Alright, without further a-do, let me tell you how I built this mind-blowing, can't-live-without, got-to-have, life-changing feature.
First things first: Loading the images
As you might have noticed, I use nine different images to simulate the rotating effect. Which image is displayed depends on the position of the mouse cursor. I tried multiple approaches on how to load the images, but only one gave satisfactory results. Nevertheless I will show you the different approaches I tried out, in order to make you understand why I chose the variant in use now.
Variant A: One <img> tag, load source through jquery's .css() function
This approach was the first one I tried, because it uses the least amount of repetitive html code. The process is simple enough: There is a single <img> tag with a default source for the image that is supposed to be displayed by default (in my case, the image where I am facing the camera).
When the cursor reaches a point where a different image has to be displayed, the images source is changed with jquery's .css() function. For example if the cursor is on the left-hand side of the image and I would like to load the image of me facing left, the following code is applied:
The problem with this approach is that the load time for the images is insanely long - it takes the image a couple of seconds to load before it displays, which is simply not viable in the web-environment.
Variant B: multiple <img/> tags, change display property
For this second approach I created multiple <img/> tags, so that the images would load as soon as the page is accessed. All the images are stacked on the exact same position.
All the <img/> tags had their css property display set to none by default, except for the image displayed when the page is loaded.
In order to display the image according to the mouse-cursors position, I simply changed the display setting from none to inline for the image I wanted to display and the display property of all other images to none. As in the example above, if I wanted to display the image of me facing left, I would use the following code:
The problem: Every time the image changes there is no image displayed for just a split-second. Although the images change rapidly, this short "blink" made this method unusable as well.
Variant C: multiple <img/> tags, change z-index property
Again I used multiple <img/> tags so that the images load as soon as the website is called upon.
However, instead of not displaying the images at all by setting the display property to none, I simply switch which image is on top of the stack with the z-index property. The z-index property of all the images is 0 by default, and I simply change the z-index of the image I want to display to 1.
Again, if I wanted to display the image of me facing left, the following code would come into use.
This is the approach I use on this website. The images load rapidly and there is no blink-effect when the images switch.
Defining which image is displayed where
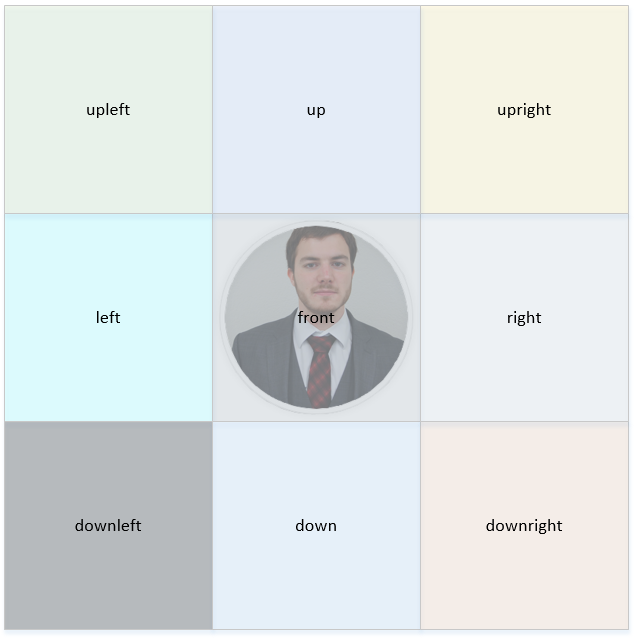
The theory is pretty simple: We get the position of the mouse-cursor and figure out where it is located in relation to the image (if the cursor is located on the upper-left-hand side of the image, for example, that is all we need to know). Let me illustrate what I mean:

But how do we do that? First, we need to detect the borders of the image, so that we can determine if the mouse-cursor is currently above or under a certain border. As the image has a rectangular shape, there are four borders (duh): the top, the bottom, the left and the right.
In order to get the top and left border, I used jquery's .offset() function, which returns an objects top and left position relative to the document. I saved the returned values in a variable.
Now that we have the top and left borders, it is pretty simple to get the bottom and right ones too: Simply add the height, respectively the width, of the image to the borders we already have. Jquery has functions already in place to get these values - .width() and .height()
Locating the cursor
Now that we know where our images borders are, we need to get the cursor location. Again, jquery hands us the tools to solve this problem, with the .mousemove() function. With this function we are able to set an event that triggers every time the mouse-cursor is moved. As a parameter we can tell the trigger which function we want to be executed once the event is triggered. As we want the event to trigger no matter where on the website the user moves his cursor, we will add the trigger to the window element.
So: If the mouse-cursor is moved in the window element, we execute the function getMousePosition().
Getting the position of the mouse-cursor is simple enough. The .mousemove() function passes an event object to the getMousePosition() function, in which the position of the mouse-cursor is stored. We have to simply access this information, as seen below.
Connecting the cursor position to the image borders
Now that we have the cursors position, as well as the images borders, all we have to do is check where the cursor is relative to the image. To do this I used a simple if-else operation. For every position, as seen in the graphic above, I check if the conditions are met. For example for the top-left position, I check if the cursors position on the x-axis is further left than the images left border and if the cursors position on the y-axis is higher than the images top border. If the conditions are met I put the according image on top of the image-stack with the z-index, as explained above.
And that's all the elements we need to create the rotating head.
Putting it all together
Now that we have all the elements needed to create the rotating head, let me show you how I put it all together.
First, load the images in the html file where you need them.
Next, in the css file, set the z-index of all images to 0, except for the one you want to display as a default, for which you set the z-index to 1 (in my case the front shot).
Then, in a script tag, set the mousemove event trigger on the window element.
Making the code object-oriented
Okay, so we managed to create a simple rotating head. But what if we want multiple heads, as seen on our contact page? We could just copy the code a bunch of times, true, but that wouldn't be pretty… And at cloudtec, we love pretty code. So I decided to make the code object oriented, thus it is enough to make an instance of the object, containing all necessary variables and functions, per rotating head we want to display.
First off, we need to make a prototype for the rotating head object. In the constructor, I passed it a variable "classname", which will be used to identify the html object related to the instance of the prototype. Next, we initialize the variables specific to the instance, with the "this" keyword. We also have to create a function which allows the object to decide which image has to be displayed. I saved all this code in an external file, for better maintainability and better code-structure.
Now all we have to do is make a new instance of the HeadImage prototype in the init function for every rotating head we want on our page and then call its setImageDirection function in the event triggered by mousemove.
In the downloadable code there is an example with three rotating heads.
Bonus: Displaying text when hovering over an image
You may have noticed the text that appears when you hover over one of our heads on our contact page. Getting this effect is pretty simple: You need to create a div, give it a class (I called it text-holder), initially set its display property to none and change this property to inline as soon as your mouse-cursor is in the "front" sector of your image. This feature is built-in in the downloadable code.
Simply add the following code to the "else" clause in the setImageDirection function of the HeadImage prototype:
Bonus: The resize problem
All this is well and good, but there is still one problem: When you resize your window, nothing works properly anymore, because the calculated borders are not at the same place anymore. To solve this problem, simply add an event listener to the window element, and tell it to re-initialize the objects once the window has been resized.
In conclusion
I hope you enjoyed this little tutorial. If you have any questions, suggestions or marriage-proposals feel free to leave a comment below. Have a wonderful day!